How to place your fingers on a guitar chord
Your fingertips go just behind the fret wire, not on top of it, with the last joint of each finger bent so the tip stands almost straight up.
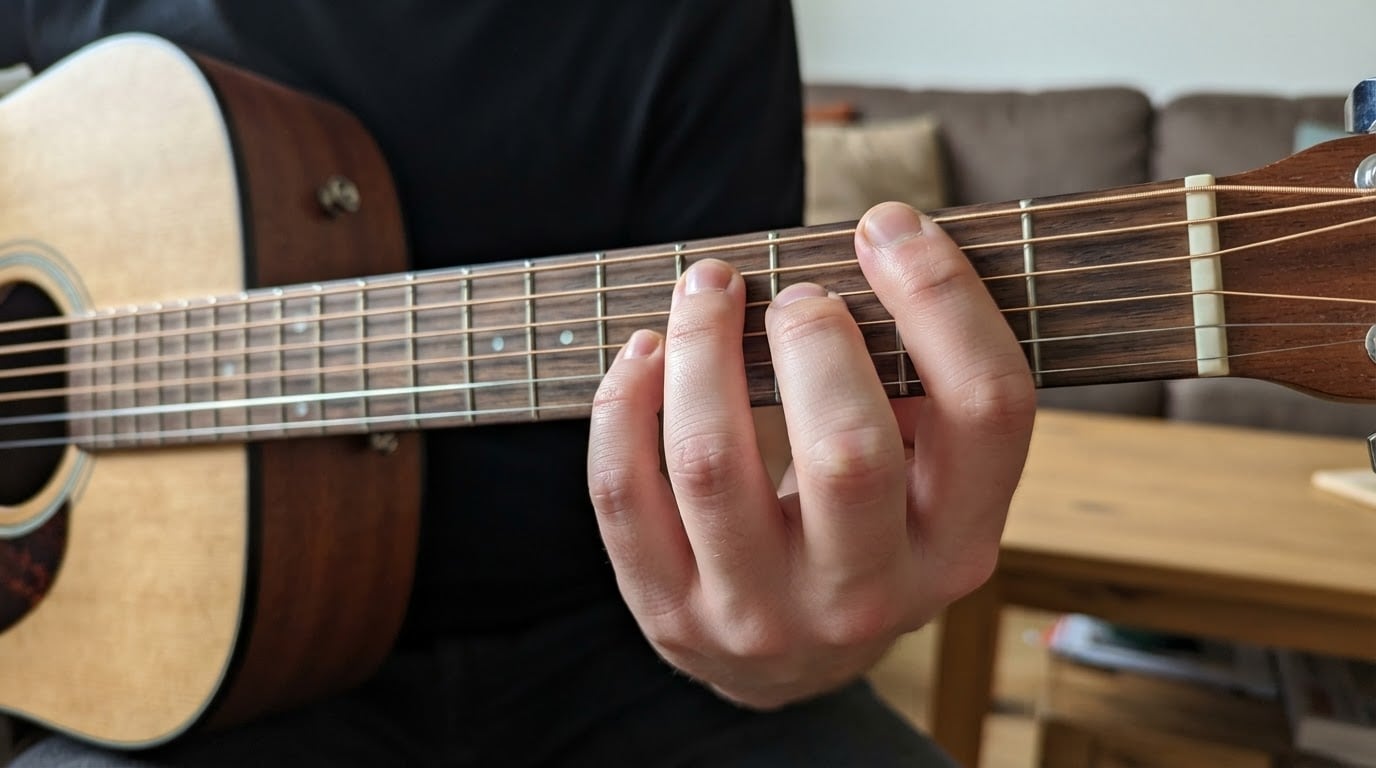
Three checkpoints decide whether a chord rings:
- On the tip. The string should meet the pad of your fingertip, away from the soft side of the finger and the nail.
- Behind the fret. Aim for the back edge of the fret, as close to the metal as you can get without pressing on it. The closer the fingertip sits to the fret, the less distance the string travels to clear the metal, and the less force the chord needs.
- Curved finger. Keep the last joint bent. A curved finger comes down at a steep angle, which keeps the joints and knuckles clear of the strings on either side.
Put your thumb on the back of the neck, roughly opposite your middle finger. It steadies the hand; it does not need to squeeze. If your palm rests against the neck or your wrist bends sharply, the fingers lose the angle they need.
Press until the note rings, then stop. Extra pressure does not improve the tone, it pushes the string slightly sharp, and it tires the fretting hand within minutes.
Check the shape one string at a time, from the low E string to the high E string. Every string the chord uses should ring with the same clear tone.
Quick answers
These are the short answers to the questions beginners hit first. Each one stands on its own.
- Where do your fingers go? On your fingertips, just behind the fret wire.
- How hard should you press? Only until the string rings clearly. Anything beyond that is wasted effort.
- Which finger plays which note? The number inside the dot on a chord diagram: 1 index, 2 middle, 3 ring, 4 pinky. The thumb stays behind the neck.
- Why does a string buzz? Usually the fingertip is too far from the fret, or another finger is brushing the string.
- Which comes first, diagrams or tabs? Diagrams, because they show the shape of the chord. Tabs tell you when to play it.
- Which chords should a beginner learn first? The open chords in the first song you want to play. Em and Am are the easiest two-finger shapes, and C, G, and D are the usual next step.
Why a chord buzzes or sounds muted
A buzz almost always means a fingertip is sitting too far from the fret or is touching a string that should ring.
- Buzz on one fretted string. The fingertip is too far behind the fret. Slide it forward until it presses just behind the metal.
- A dull thud instead of a note. A collapsed last joint is flattening the finger onto a neighboring string. Rebuild the shape with the curve back in the finger.
- An open string goes silent. The side of a finger, or the base of the index finger, is resting on it. Lift the hand slightly and keep the palm off the neck.
- The buzz gets worse the harder you press. Pressure is not the fix. Move the fingertip closer to the fret instead.
- The same buzz at the same fret every time. Check the string and the guitar. A worn string, a high fret, or an action problem can buzz no matter how you place your fingers.
Barre chords add one more variable. Roll the index finger slightly onto its bony edge and hold it with the forearm rather than the thumb alone. Barre shapes get easier once open chords are comfortable, so treat them as a later step.
Reading chord diagrams, charts, and tabs
A chord diagram shows the shape your hand should make; a tab shows what your fingers do over time.
On a chord diagram:
- The vertical lines are the strings. Drawn like a picture of the fretboard in front of you, the leftmost line is the low E string and the rightmost line is the high E.
- The horizontal lines are the frets, and the thick line at the top is the nut. When the diagram starts higher up the neck, a number at the left tells you which fret the top line represents.
- A dot marks where a finger goes, and the number inside the dot tells you which finger to use.
- O means play the string open, with no finger on it. X means leave that string out. Both are placement instructions, so read them before you strum.
On a tab:
- The six lines are the strings too, but the order is reversed: the low E string is the bottom line.
- Numbers are frets, not fingers. A 0 means an open string, and numbers stacked in one column are played together as a chord.
A printable chord chart or PDF is useful next to your practice spot, especially when you are away from a screen. Look for clear finger numbers, open and muted string markers, and fret positions large enough to read from playing distance. Chord pictures and diagrams show shapes; tabs and chord sheets show when to use them. Keep both nearby as you learn.
Practice that makes finger placement automatic
The fastest way to lock in finger placement is to build one chord, check every string, then practice changing between two chords slowly enough that the shape arrives clean.
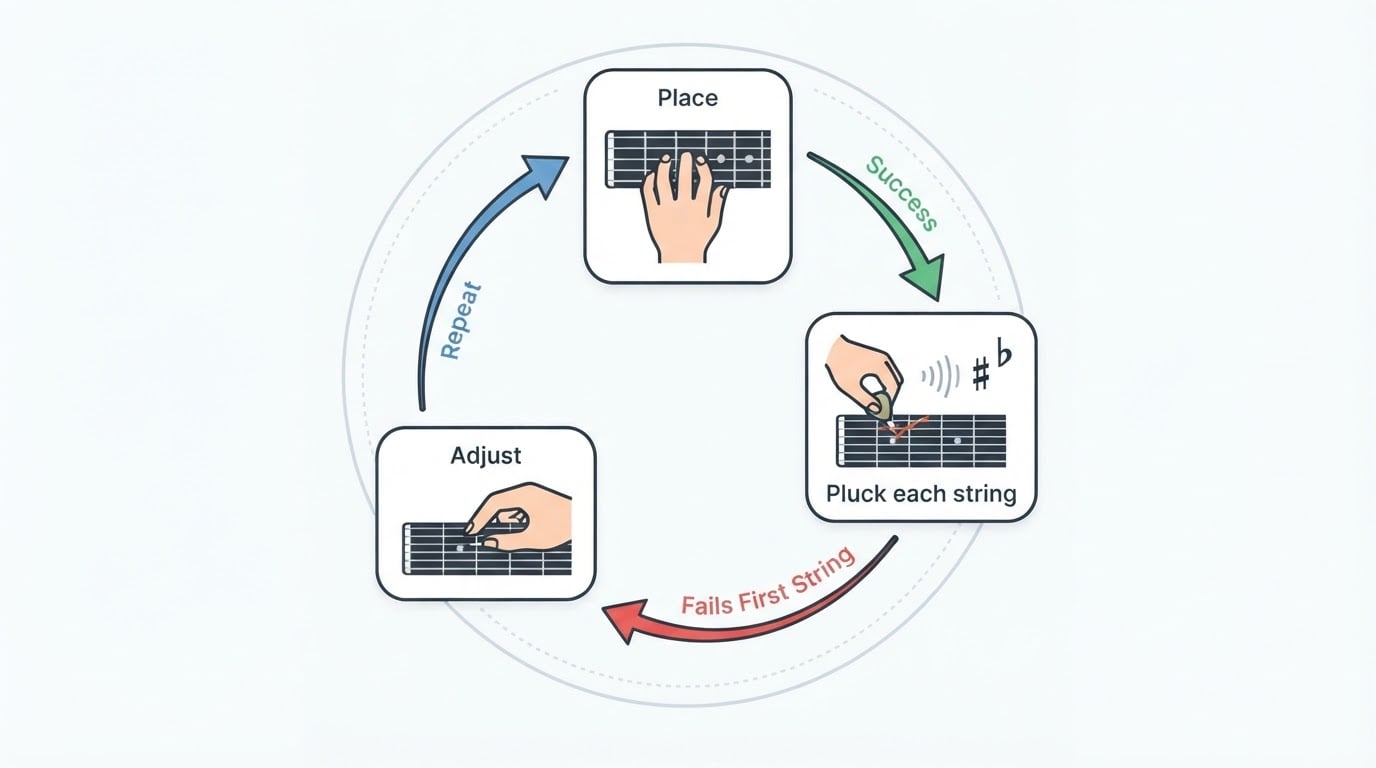
- Build the shape without pressing. Place the fingers on the strings in order, from the bass string up, and check that each one sits on its tip.
- Pluck string by string. Play from the low E to the high E and find the first string that does not ring. Fix that finger before you strum the chord.
- Lift and rebuild. Take the hand off the strings completely, then place the chord again. Repeat until the shape lands without hunting for positions.
- Change between two chords in time. Pick two chords you know, set a metronome to a slow tempo, and change only on the first beat. Keep the strum steady even when the shape arrives late.
- Count clean changes, not fast ones. In one minute, count only the changes where every string rings. Next session, try to beat that number without raising the metronome.
The completion standard is simple: every string rings, no buzz, and you can find the change with no more than a glance at your hand. Short daily practice beats one long session a week, and it is worth stopping when the fretting hand starts to tighten.
If you want to compare your shape against a reference, GuitarTuner.io keeps a free browser chord reference alongside its tuner. Each chord appears as an interactive diagram with variations and audio playback, organized from the beginner open chords through seventh, suspended, power, and barre shapes, so you can check what you are pressing against what you are hearing.
Frequently asked questions
Is there a free printable guitar chord chart for beginners?
Yes. Printable chord charts are widely available for free, and one page of open chords is enough to start. Look for clear finger numbers, open and muted string markers, and dots that sit on readable frets.
Should a beginner learn from chord pictures or tabs?
Start with chord pictures, then add tabs. Pictures and diagrams teach the shape of a chord; tabs tell you the order and rhythm of the notes in a song. Learning from tabs alone leaves the placement of each finger to guesswork.
How can you tell whether your finger placement is correct?
Pluck each string one at a time, from the low E string up to the high E. A correct shape rings clearly on every string the chord uses, with no buzz and no muted note. Fix the first string that fails before you play the whole chord.
Why do the same fingers buzz on one chord but not another?
Different chords stretch the hand into different shapes, so the angle of each finger changes. A finger that curves comfortably on Em can flatten on C, and a flattened finger touches its neighbor. Rebuild the shape slowly and keep the last joint bent on the string that buzzes.
Do you need to learn every chord shape before playing songs?
No. Many beginner songs use a small set of open chords, so learn the shapes your first three or four songs need and add new ones as they appear. Comfort with placement matters more than the number of shapes you can name.